Blog: How to use the Manufacturing Cost Calculator, step by step
Manufacturing Cost Calculator · Tutorial
How to use the Manufacturing Cost Calculator, step by step
Go from a dieline to a manufacturing cost in seven steps. The calculator searches every manufacturing line that can make your box, works out the nesting on the sheet, and calculates the cost of every operation — material, printing, die cutting, lamination, glueing and more.
- 7 steps
- Template becf-11011
- 80 × 40 × 120 mm
- 5,000 boxes
- Priced in USD
Step 1 of 7
Select a template
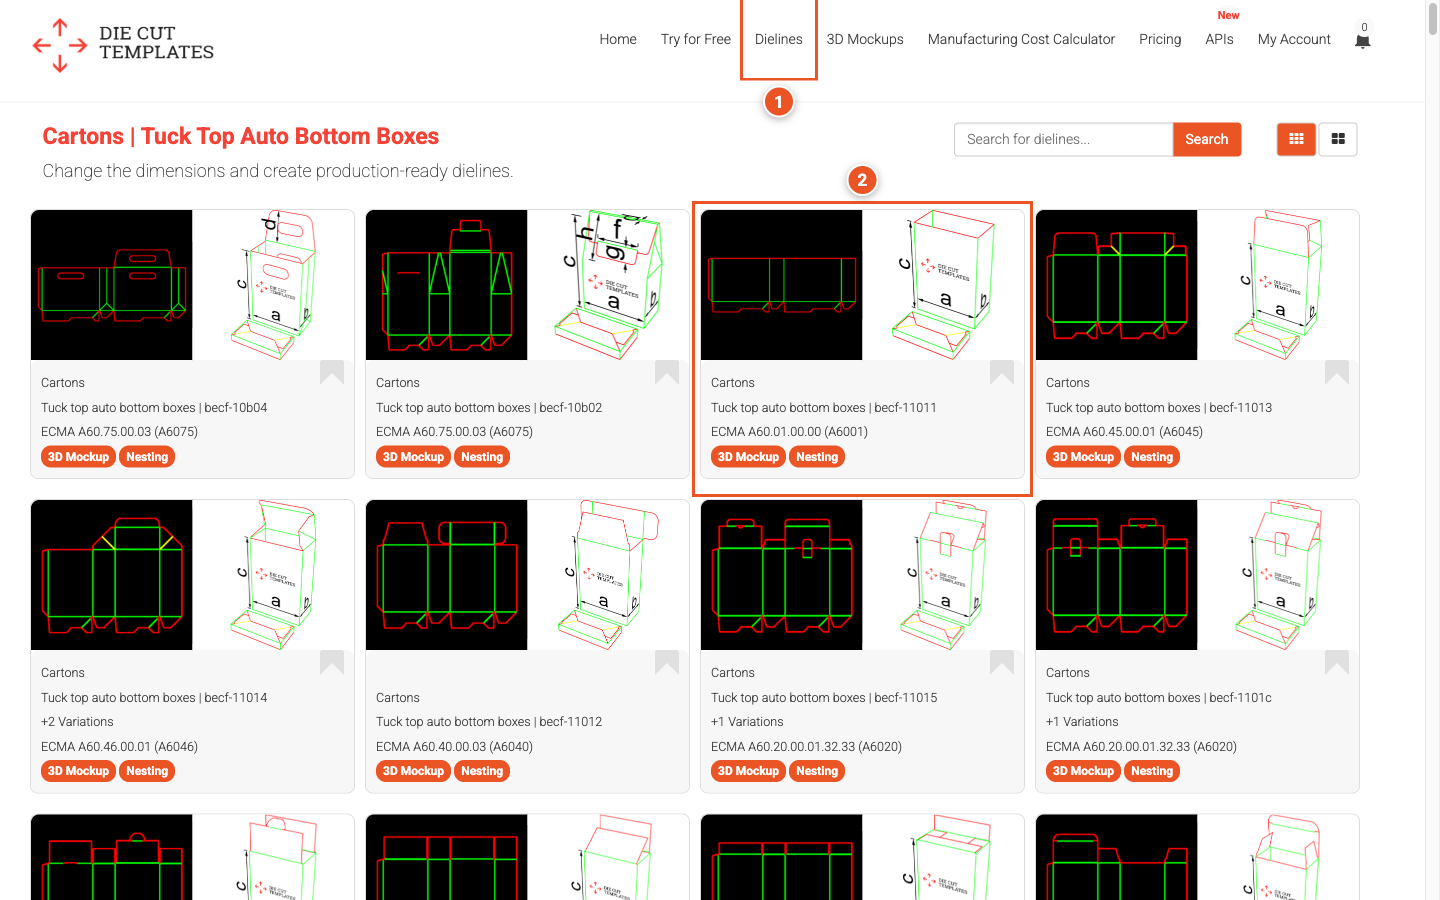
- Open Dielines in the top menu and pick a category — here Cartons › Tuck top auto bottom boxes.
- Click the template you want to produce. We use becf-11011.
Step 2 of 7
Enter the dimensions
- Type the length, width and height of your box, and choose the material above them.
- Click Confirm and redraw. The dieline is redrawn at your size and shows the flat size of the blank — 252.50 × 149.00 mm for our box.
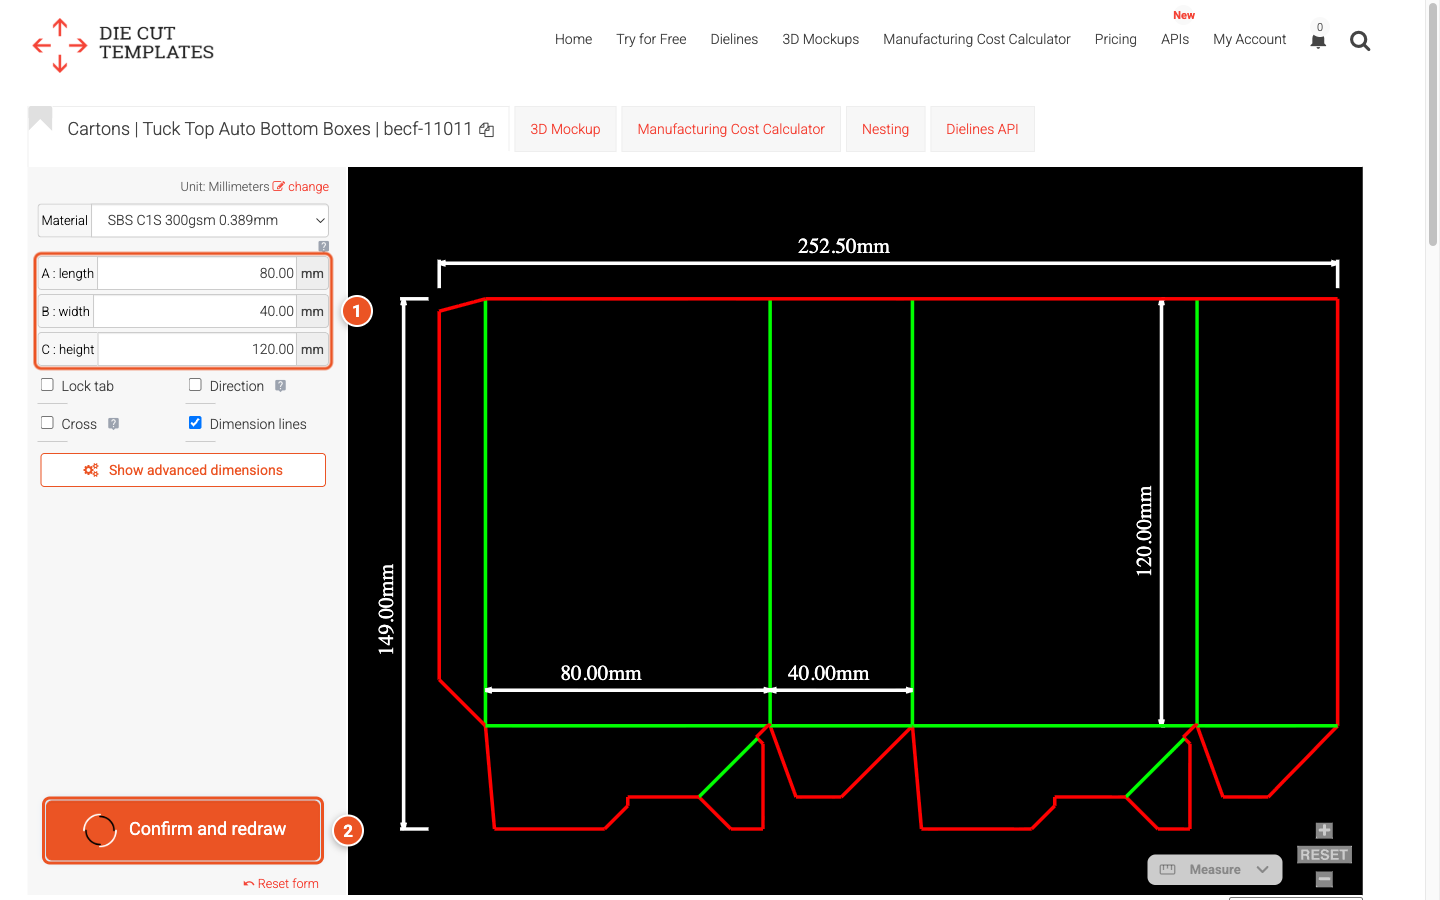
The calculator uses exactly the dimensions on the dieline, so set them before you move on.
Step 3 of 7
Click Calculate Manufacturing Costs
- Below the dieline, click Calculate Manufacturing Costs. A new calculation is created for the dieline you just drew and opens straight away.
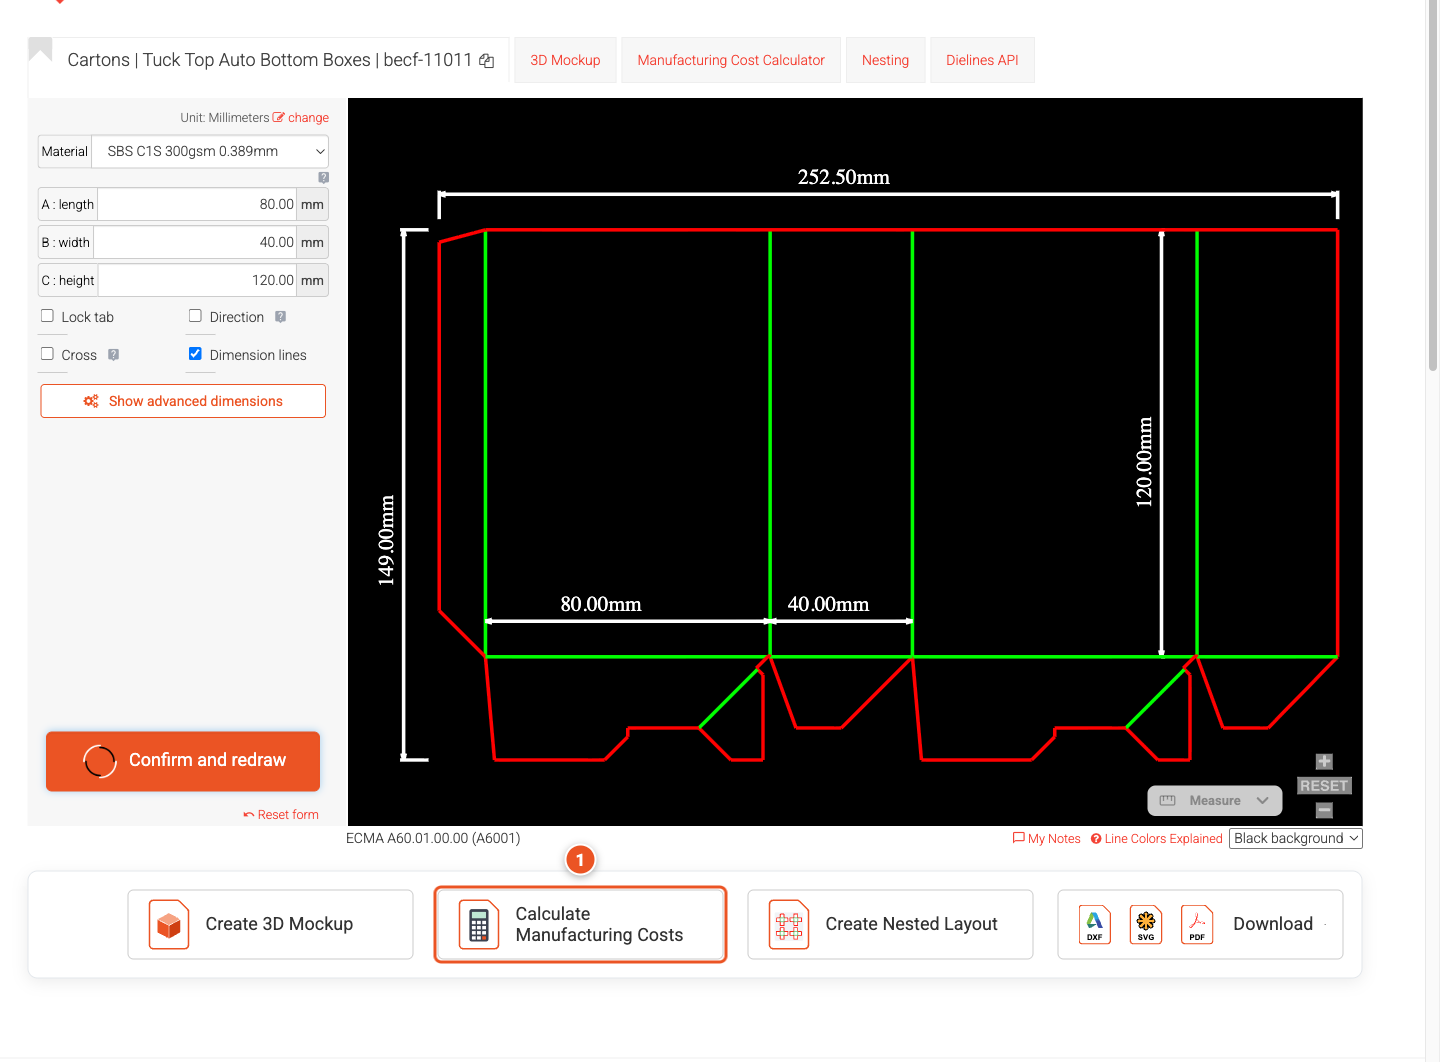
The Manufacturing Cost Calculator tab above the dieline does the same. If you have calculated this template before, your earlier calculations are listed first — click Generate new calculation on the card with your current dimensions to start a new one.
Step 4 of 7
Enter the order amount and currency
A new calculation opens with a short guided setup. Its first stage asks How many do you need?
- Enter the Quantity in order.
- Choose the Currency you want the price in. Prices you entered in another currency are converted for you.
- Click Next.
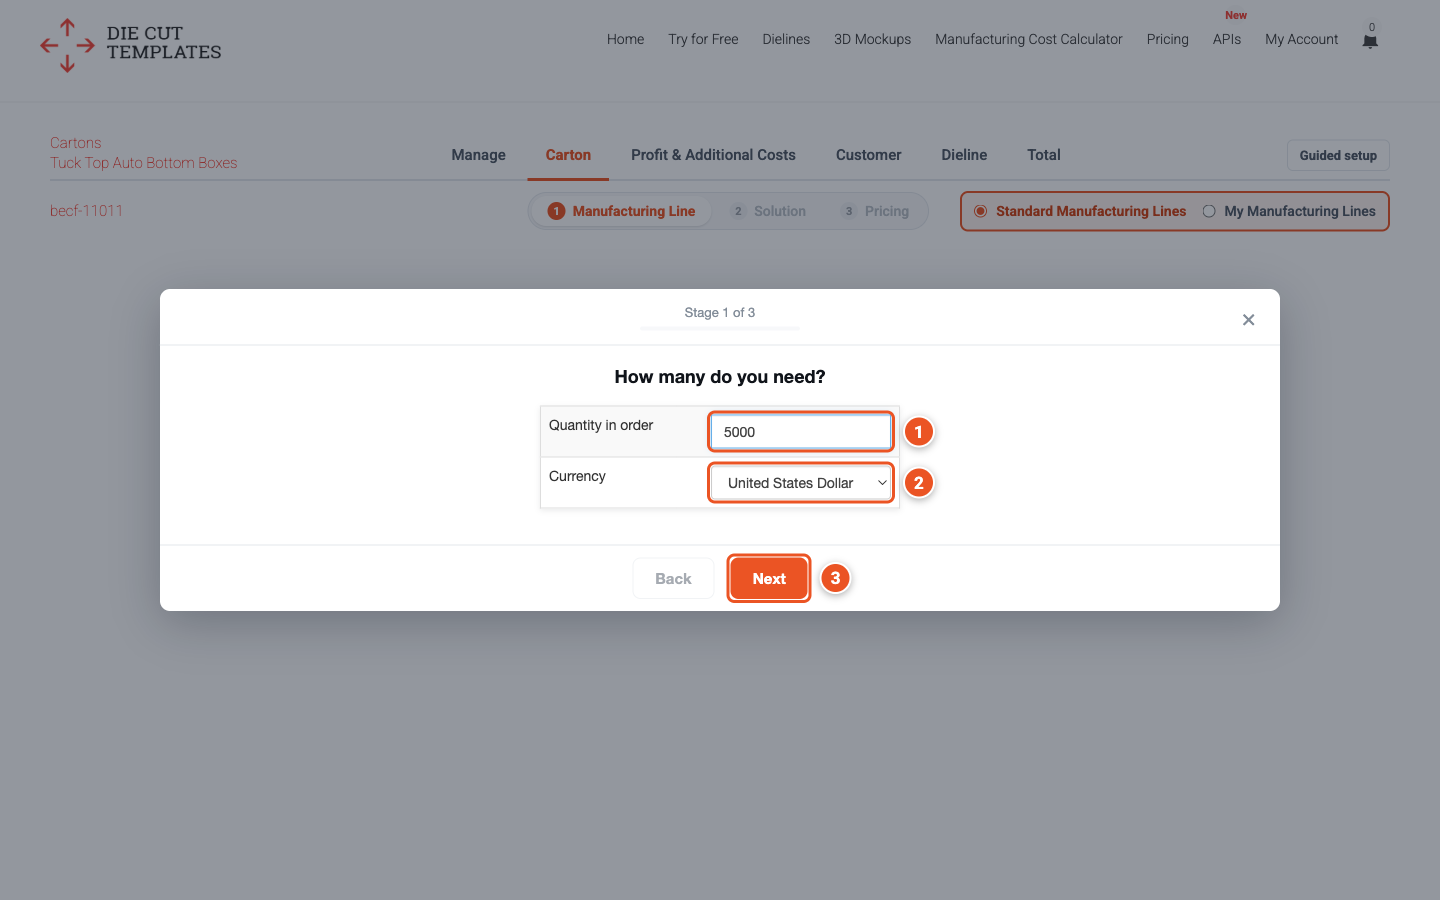
You can change both later on the Manage tab, and reopen the guided setup at any time with the Guided setup button.
Step 5 of 7
Select the manufacturing line
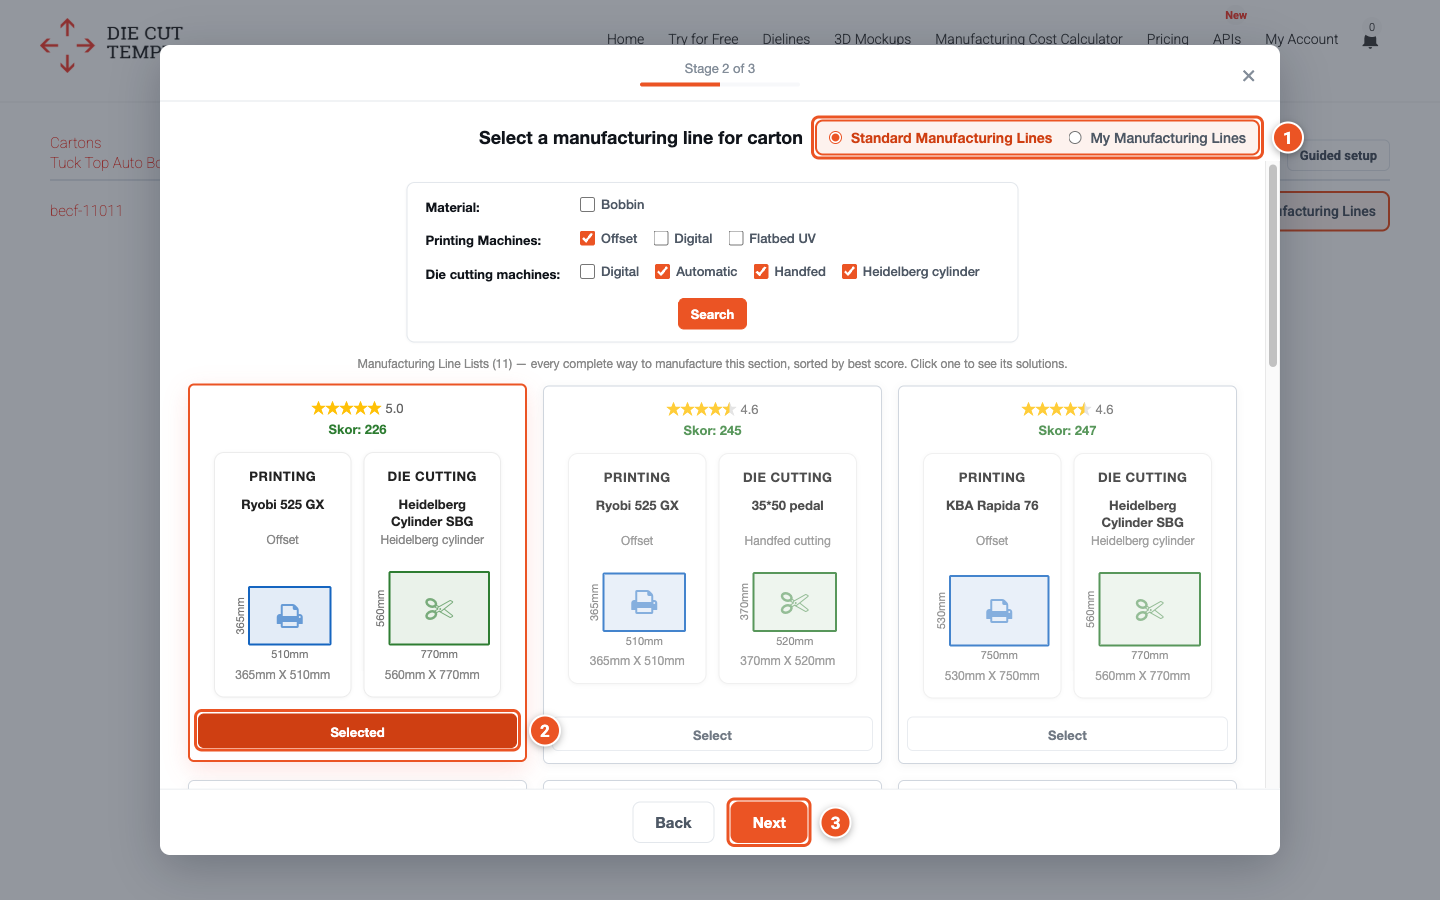
The second stage lists every manufacturing line that can make your box — a printing machine paired with a die-cutting machine — sorted by best score, so the strongest option comes first. The filters at the top narrow the search, for example to offset printing machines only.
- Choose where the machines come from.
- Click Select on the manufacturing line you want.
- Click Next.
Standard Manufacturing Lines
A ready-made set of machines and prices. You get a result immediately, even before you have entered any data of your own.
My Manufacturing Lines
Your own printing and die-cutting machines, with your own prices.
Once you have priced a calculation, the guided setup asks this choice as a stage of its own, right after the quantity: Which manufacturing lines should we use? Pick Standard Manufacturing Lines or My Manufacturing Lines and click Next — the manufacturing lines are listed on the stage after it.
Step 6 of 7
Select a solution
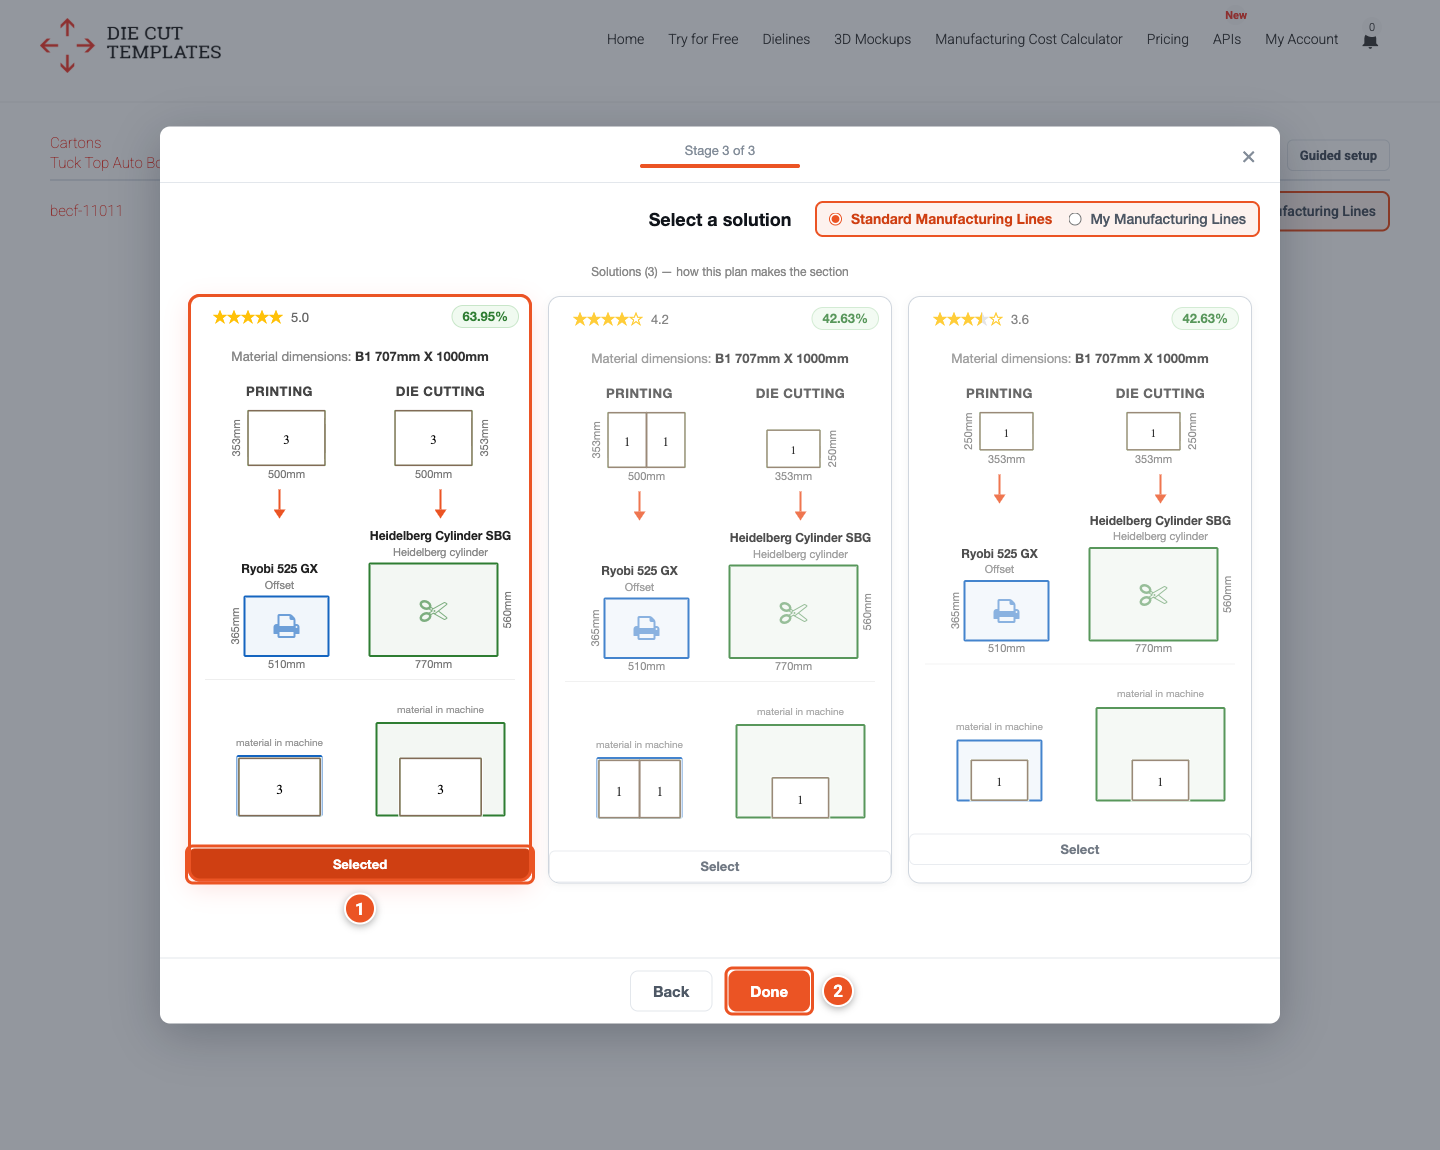
A manufacturing line can usually make the box in more than one way. Each of these solutions shows:
The sheets
The material sheet it starts from, and the sheet size that goes through printing and die cutting.
The nesting
How many boxes fit on each sheet, and the percentage of the material the dielines use.
In our example the best solution cuts a B1 sheet (707 × 1000 mm) into B3 sheets and places three boxes on each one, using 63.95% of the material.
- Click Select on the solution you prefer.
- Click Done.
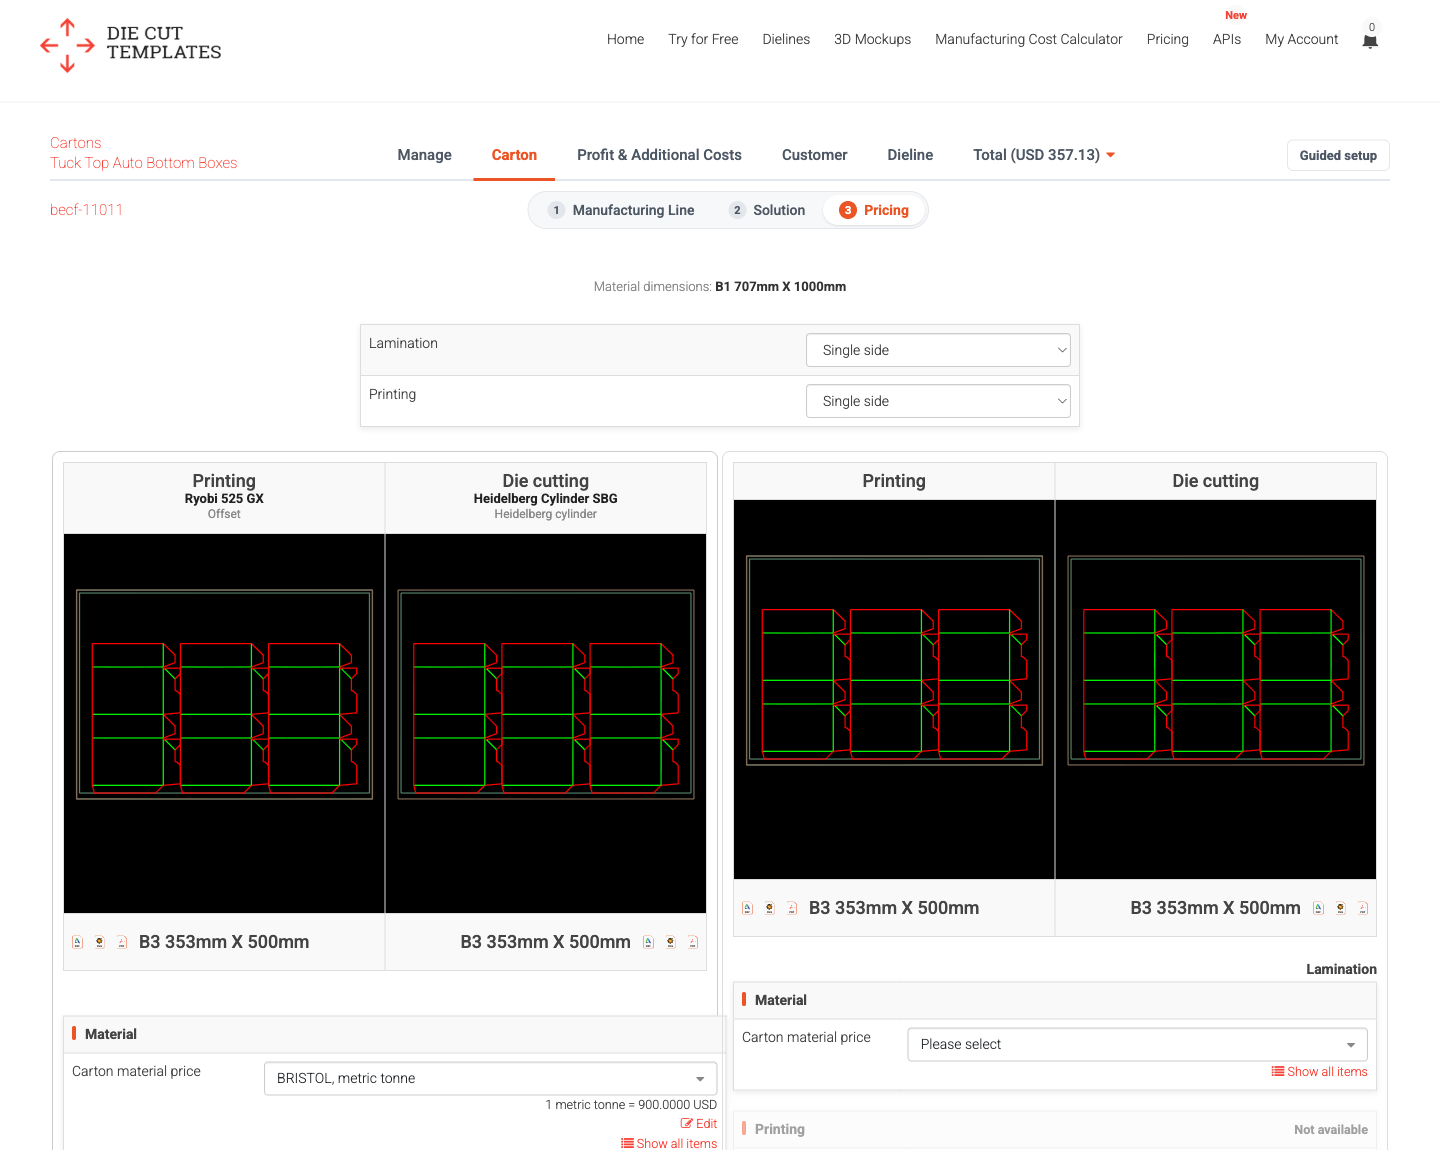
You land on the Pricing step, which shows the nesting for printing and for die cutting, with DXF, SVG and PDF downloads of each sheet.
Step 7 of 7
Add pricing sections like lamination and glueing
Below the nesting, the manufacturing cost is split into pricing sections. Every section you fill in adds its cost to the total; the ones you leave empty are not charged. In our example we fill in five of them:
- Material
- Lamination
- Printing
- Cellophane
- Lacquer coating
- Hot stamping
- Guillotine cutting
- Cutting
- Glueing
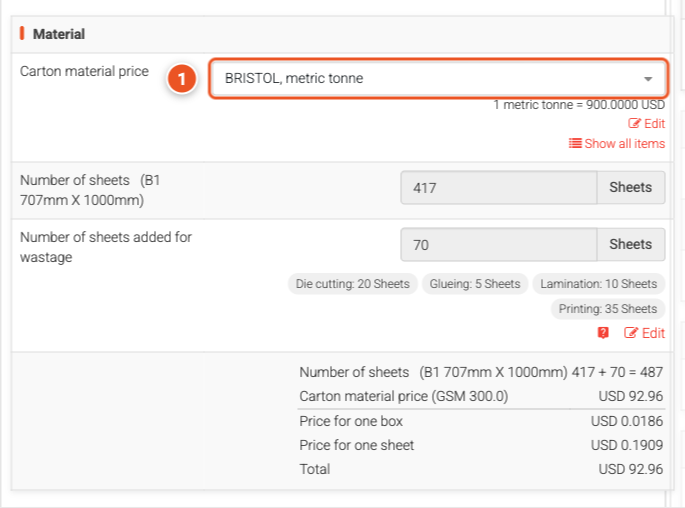
First Material
The other sections stay locked with “Material section is incomplete” until a material price is chosen.
- Pick your Carton material price. The calculator works out how many sheets you need, adds the sheets lost to wastage automatically and shows where they come from — here 70 extra sheets for die cutting, glueing, lamination and printing.
Add Lamination
- At the top of the Pricing step, set Lamination to Single side.

- In the Lamination section, choose Machine or Manual.
- Choose your lamination price.
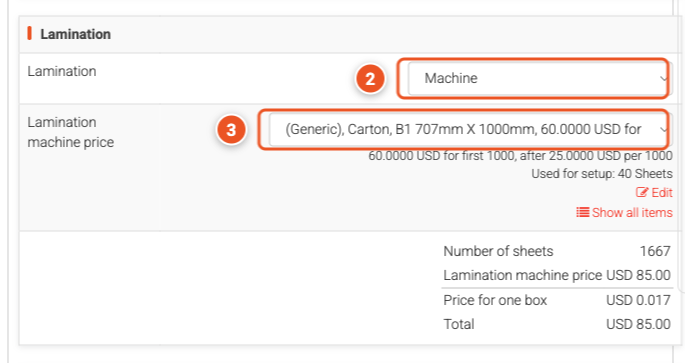
Switching lamination on also adds a second column for the laminated layer, with its own sections to price.
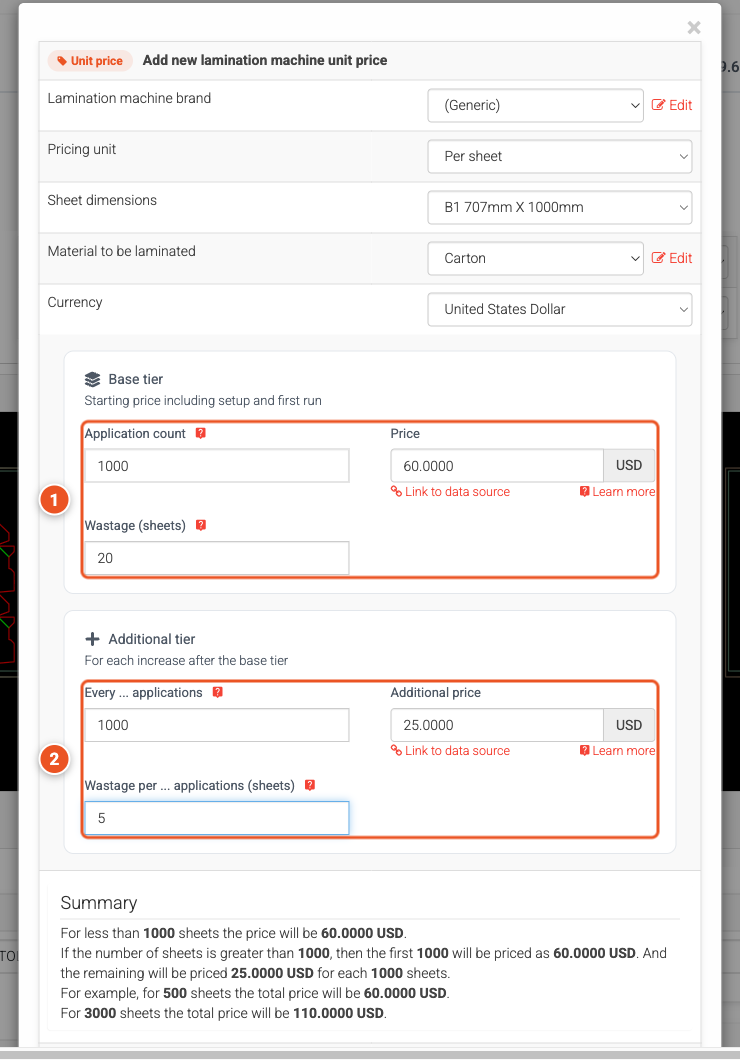
If you pick a machine you have not priced yet, a form opens so you can enter its unit price on the spot:
- The Base tier — the starting price, including setup, for the first run.
- The Additional tier — the price for each further batch.
Each tier has its own wastage. The Summary at the bottom shows what your tiers mean in plain numbers; click Save when it looks right.
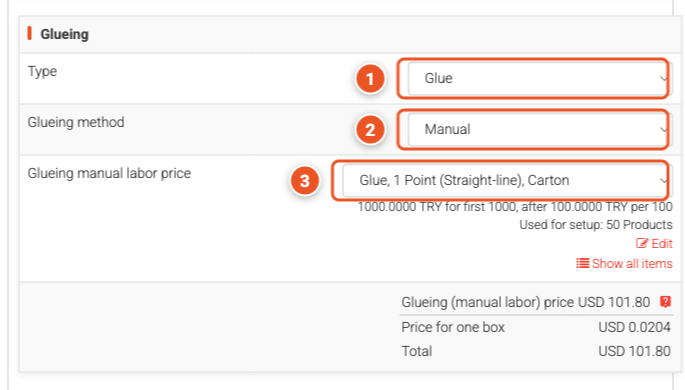
Add Glueing
- Choose the Type: glue, tape, or glue and tape.
- Choose the Glueing method: manual or machine.
- Choose your glueing price.
Fill in Printing (colors and printing machine price) and Cutting (die-cutting machine price, and optionally the cutting board and metal strips) the same way, and add cellophane, lacquer coating, hot stamping or guillotine cutting when your box needs them.
Result
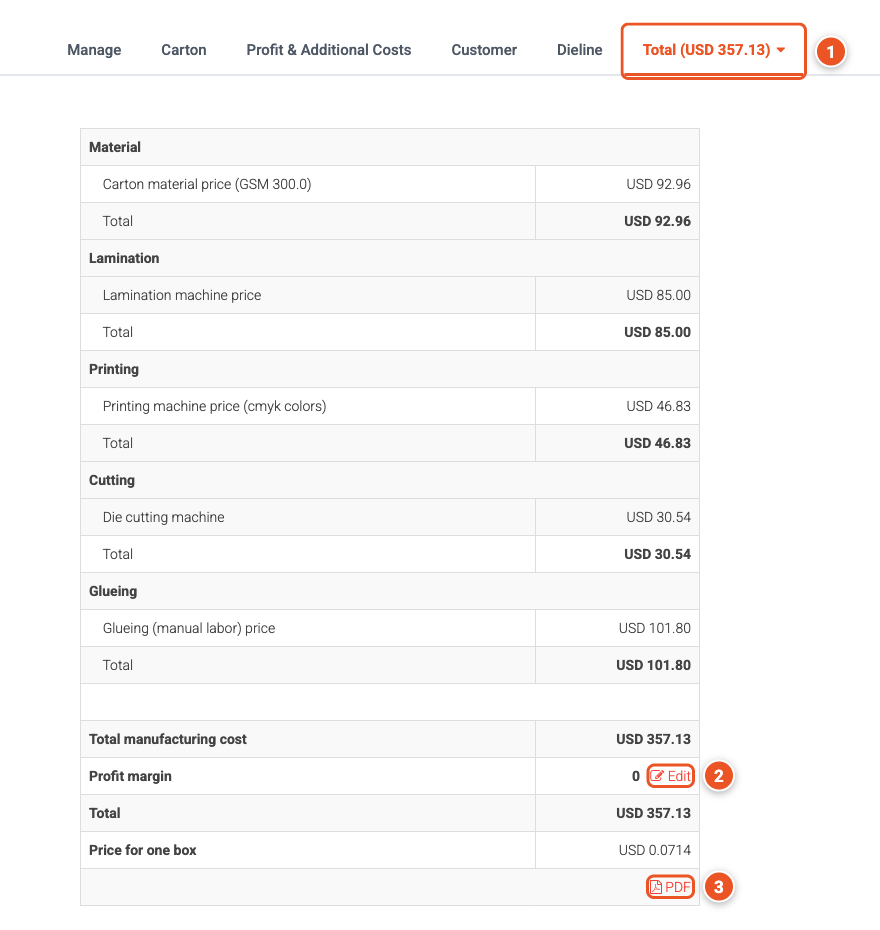
Your manufacturing cost
Total for 5,000 boxes
USD 357.13
Price for one
USD 0.0714
- Open the Total tab for the full breakdown: each section's cost, the total manufacturing cost and the price for one box.
- Click Edit next to Profit margin to add your margin.
- Download the result as a PDF.
You can go back to the Manufacturing Line and Solution steps at any time to compare other options for the same box.
 Die Cut Templates is an online packaging template collection, custom dieline generator, template maker and a packaging design tool with nesting, manufacturing cost calculator and 3D capabilities. All of the packaging templates are easy to download.
We have over 35,000 vector packaging templates (dielines) for tuck end boxes, snap lock boxes, tuck top auto bottom boxes,
standard boxes, four corner tray boxes, fruit and vegetable boxes, special boxes, separators, paper bags, gift boxes
and a great number of packaging templates. With Die Cut Templates, you can arrange your dielines using the nesting tool.
Die Cut Templates also offers uploading your logos and artwork for your 3d Mockup designs and offers online previews in 3D.
Die Cut Templates also provide a Dielines API.
Dielines API allows for generating custom dielines in PDF, DXF, and SVG formats, along with 3D mockups and nesting.